How Often Should a Pier and Beam Foundation Be Inspected?
Last updated: September 10, 2026
Key Takeaways
- Rain changes the picture fast: inspect within 24 to 48 hours after rainfall, and drainage issues show up more plainly.
- Under about 18 inches of clear height, a crawl space gets awkward to inspect well.
- People crawl to the front opening, spend 5 minutes looking around, and call it finished.
- A pier and beam foundation should be inspected once a year in ordinary conditions, and every 6 months when risk is higher.
For a pier and beam foundation, the plain answer to how often should pier beam foundation be inspected is once a year at minimum — twice a year if the house sits in wet soil, on a slope, or in a region with wide seasonal moisture swings. I’d also check it after any major leak, flood, earthquake, or visible floor movement. Not for theater. To catch rot, settlement, termite damage, and moisture problems before they turn into sagging floors and expensive structural repair.
Who this is for, and what I am assuming you already know

This applies to homeowners with a wood-framed house supported by piers, beams, and joists over a crawl space. I’m assuming you can get into the crawl space safely, know where the interior floors feel soft or sloped, and can identify basic building parts like joists, beams, posts, and footings. A pier and beam foundation is not the same as a slab; the warning signs and inspection points change.
For most houses, a yearly inspection is the baseline for how often should pier beam foundation be inspected. I’d tighten that to every 6 months if the home has a history of drainage trouble, if the crawl space has standing water, if the site uses expansive clay soil, or if the house is older and has already been re-leveled once. In places with termites or heavy humidity, annual is the bare minimum, not the ideal. And if you have unexplained floor sagging, separated trim, doors that suddenly stick, or visible structural movement, waiting until the next scheduled visit is the wrong move.
This is a job a homeowner can partly handle. You can check access, moisture, pests, staining, and obvious movement yourself. But don’t try to correct significant settlement, cut or sister structural members, or make a drainage change that requires excavation unless you already know the load path and local code requirements. If you find cracked piers, crushed shims, failed pads, or a beam that has lost bearing, that’s when a qualified foundation contractor or structural engineer should step in. The International Association of Certified Home Inspectors notes that crawl spaces deserve careful moisture and structural attention, and IRC R408 addresses crawl-space ventilation and access requirements.
How often should a pier and beam foundation be inspected?
A pier and beam foundation should be inspected once a year in ordinary conditions, and every 6 months when risk is higher. Simple answer. But the right interval depends on what sits under the house and what is happening around it.
I use four practical buckets:
- Every 12 months: homes on well-drained sites, with no known leaks, no pest history, and no past foundation movement.
- Every 6 months: homes in high humidity, on clay soil, near large trees, or anywhere the crawl space has had moisture problems.
- After any event: inspect within days after a plumbing leak, flooding, a sewer backup, a gas-line trench, an earthquake, or a major storm that changes drainage.
- Before a major decision: inspect before buying, before remodeling that adds point loads, and before replacing HVAC, tile, masonry, or other heavy finishes that can reveal a hidden support issue.
The reason for the timing is pretty straightforward. Pier and beam systems can fail slowly; the trouble creeps, then suddenly shows its teeth. A beam can settle onto a compromised pier. A wood sill can rot where it sits on damp masonry. Termites can tunnel through framing long before the floor feels obviously unsafe. A drain line can leak for months and only show up as a musty smell and swollen subfloor.
I’d be more aggressive with inspection if the house has any of these conditions: crawl-space vents that stay wet, soil that shrinks and swells with the seasons, shallow footings, low clearance, or evidence that a previous owner already added shims to level the structure. Shims are small wood, metal, or composite spacers used to fine-tune beam height; too many stacked in one spot usually mean the real problem was never corrected.
Do not assume “no visible problem” means “no movement.” A 1/4-inch change can matter if it is concentrated over a span or if it keeps growing. The job is to look for change, not perfection.
What should I check during the inspection?

Check moisture, movement, wood condition, pest activity, and the condition of supports — in that order. Start where the damage begins: water.
- Check drainage outside the house. Walk the perimeter and verify soil slopes away from the foundation for at least 6 feet, and that downspouts discharge well away from the crawl space, ideally several feet from the wall. If water pools near the house after rain, that is a warning sign.
- Measure crawl-space access and clearance. Confirm you can enter safely and that there is enough room to see the supports. A crawl space under about 18 inches of clear height is harder to inspect properly. If you cannot reach the key beams and piers, your inspection is incomplete.
- Look for moisture evidence. Check soil dampness, condensation, mud lines, staining, and moldy odor. Verify whether insulation is sagging or wet. Standing water, persistent damp soil, or white mineral deposits on masonry point to chronic moisture problems.
- Inspect wood members. Probe sill plates, joists, and beams with a screwdriver or awl. Solid wood resists and feels firm. Soft, punky, or darkened wood indicates rot. Pay attention to beam ends and areas near plumbing lines.
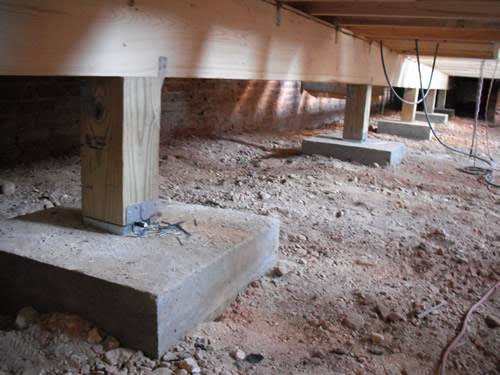
- Examine piers and footings. Look for cracked brick, leaning blocks, shifted concrete, or missing mortar. Verify that piers sit plumb and on proper footings, not directly on bare soil. A tilted pier, a gap under a beam, or crushed material under a support means the load is not being carried evenly.
- Check shims and bearing points. Make sure shims are tight and stacked neatly, not wedged out at an angle. Loose or scattered shims suggest movement. A beam that has slipped off its bearing even slightly is a real problem, because bearing loss can cascade into floor sag.
- Look for signs of pests. Inspect for termite tubes, ant activity, sawdust-like frass, and chew marks. Verify whether any wood-to-soil contact exists. Termites do not need dramatic damage to create a serious repair bill.
- Test the floors above. Walk the interior and note any springy spots, sloping floors, cracked drywall, or doors that rub. Compare doors and trim against the last inspection. New sticking or widening cracks mean movement may be active.
The pattern matters more than any single clue. One damp corner by itself is a clue; dampness plus soft joist ends plus termite tubes means the issue is already past the “watch and wait” stage. I’d jot down where each finding sits in the house, even if only on a simple sketch, because one problem at the kitchen side of the crawl space can be unrelated to another at the back wall. To stay organized, tie the notes to the same room names you would use for a crawl space inspection checklist or a foundation repair estimate.
How do I inspect it without missing the problems that matter?
Use a fixed order: outside first, then inward, then water to structure, because random checking misses the chain of cause and effect. On a small house, I’d spend 30 to 60 minutes; longer if access is tight or the crawl space is cluttered.
- Start after rain if possible. If you can inspect within 24 to 48 hours after rainfall, drainage problems show themselves more clearly. Verify whether water sits against the foundation or the soil stays dark and wet. A dry-looking site in drought can hide a bad grading problem.
- Open and secure the access point. Confirm the hatch closes properly and does not admit obvious surface water. A broken access door can let in pests and wind-driven moisture; if the hatch is damaged or unsafe, consult a professional before forcing entry. EPA mold guidance and crawl-space safety resources from OSHA both stress controlling moisture and avoiding unsafe conditions.
- Scan the entire crawl space before touching anything. Use a bright flashlight and look for low spots, hanging insulation, pipe leaks, and utility crossings. If you smell sewage or gas, stop and treat that as a separate problem, and consult the appropriate utility or a licensed professional.
- Check each pier line from one end to the other. Look for vertical alignment, cracked mortar, missing blocks, or shifting pads. Verify that the beam rests squarely on the pier. A visible gap means the support is not fully bearing load.
- Inspect beam-to-post connections. Look for rusted hardware, split wood, or crushed fibers at the top of posts. If metal connectors are badly corroded or wood fibers are compressed, the load transfer is failing.
- Probe suspect wood only in small spots. Do not gouge large areas. Push the tip of a screwdriver into stained or soft sections. If it sinks easily, note the location and extent. Surface discoloration alone is not the same as structural decay.
- Check level clues inside the house. Use a 4-foot level on suspect floors if you have one, or at least compare door gaps and baseboards from room to room. A slope that is stable may be livable; a slope that changes between inspections is the issue.
- Record findings with date and location. Take photos and note whether each item is new, unchanged, or worse. A 10-minute record beats memory. If you ever need repair quotes, a dated record helps show progression.
A good inspection leaves you with a list, not a vibe. “Looks okay” is a weak answer. I want to know whether the site is dry, whether the supports are straight, whether the wood is sound, and whether anything changed since the last look. If you are comparing conditions over time, a simple log also helps you decide whether your answer to how often should pier beam foundation be inspected needs to shift from annual to semiannual.
What are the mistakes people actually make?
The most common mistake is waiting for visible floor sag before inspecting. By the time a room feels noticeably soft, the crawl-space problem has usually been there for months. The fix is to inspect on a schedule, not by symptoms.
Another mistake is checking only the easy side of the house. People crawl to the front opening, look around for 5 minutes, and call it done. That misses rear beam lines, utility leaks, and the corner where drainage usually fails. Better to inspect the full perimeter and the center supports, even if it takes another 20 minutes.
A third mistake is treating moisture as cosmetic. Stains, odor, and a little damp soil are often the first signs of decay, and if that is happening, consult a professional before assuming the issue is minor. The consequence is rot at beam ends, mold growth, and termite attraction. The correct response is to identify the water source first, then inspect the damaged wood.
A fourth mistake is adding random shims to “fix” a bounce or dip. If you stack shims without confirming the support below them, you can disguise a settling pier instead of correcting it. That can leave the beam under uneven load. The better alternative is to treat shimming as a final adjustment after the support is sound, and to have a qualified professional confirm the load path if you are unsure.
A fifth mistake is ignoring plumbing. A slow drain or supply leak above a crawl space can destroy subfloor and joists long before the leak becomes obvious indoors. If you see corrosion, dripping, or wet insulation, the plumbing should be checked the same day.
A sixth mistake is assuming brick piers never move. Brick and block piers can crack, tilt, or lose mortar, especially if the footing is shallow or the soil shifts. If you see a cracked pier, that is not something to monitor casually for another year.
When should I stop and call for help?
Stop the DIY inspection and bring in qualified help when the problem shifts from observation to structural judgment. Here are the clear stop points.
Cracked or leaning piers: This means the load path may be compromised — stop using the area heavily and have the foundation evaluated.
Beam ends that are rotten, crushed, or split: This means the structure may no longer be carrying weight as designed — do not try to “patch” it with filler or extra shims.
Standing water or mud that returns after rainfall: This means moisture control has failed — correct the drainage issue and inspect for wood damage before anything else.
Termite tubes or active pest damage: This means the framing may be losing strength invisibly — schedule pest control and a structural check.
New or worsening floor slope, sticking doors, or widening cracks: This means movement may be active — document it and get an evaluation rather than waiting for the next annual check.
Any gas smell, sewage smell, or suspected utility leak: This means the crawl space may be unsafe or contaminated — stop and address the utility issue first.
If you are unsure whether a problem is cosmetic or structural, I’d lean toward getting it looked at. In foundation work, hesitation is cheaper than repeated guessing. A contractor or structural engineer can tell you whether the movement is within normal seasonal change, which can happen with wood-framed houses, or whether the house needs repair. For broader homeowner guidance, see signs of foundation problems and crawl space moisture control.
What changes the schedule?
The schedule changes when the house changes. A pier and beam foundation under a dry, one-story bungalow is not the same as one under a remodeled house with a heavy kitchen island, tile floors, or a second-story addition.
I would inspect more often if the home has:
– clay soil that expands and contracts with moisture
– poor site drainage or short downspouts
– a history of plumbing leaks
– crawl-space humidity that stays high
– previous leveling work
– mature trees close enough to dry the soil unevenly
– low crawl-space clearance that limits airflow
I’d also shorten the interval after a major repair. If a contractor has re-shimmed, replaced a beam, or repaired a pier, a 3- to 6-month follow-up makes sense because you want to know whether the structure stayed where it was set. That does not mean the work failed; it means structural systems deserve a second look after they are disturbed.
The one place I would not use a simple calendar rule is a house with repeated movement and a patched-together support system. If you see a pile of mismatched shims, old concrete blocks, and scattered past repairs, the real question is not “How often should I inspect?” It is “Why does this keep moving?” At that point, annual inspection is too slow for the actual risk.
What does a good inspection schedule look like in practice?
A good schedule is one annual baseline check plus another visit after the first serious rain of the season, especially if your answer to how often should pier beam foundation be inspected is being driven by moisture or soil movement. Then add a second inspection six months later if the home has any of the higher-risk conditions listed above. That rhythm gives you one look in dry weather and one in wet weather, which is often enough to catch the change that matters.
If you want a simple system, use the same dates each year: late spring, after heavy summer rain, or early fall before the ground dries out. Keep the notes, compare photos, and call for help when the pattern changes rather than waiting for obvious damage. The point is not endless checking; it is checking often enough that small movement does not turn into a structural repair.
If you are comparing schedules across different home types, a pier and beam foundation usually needs more frequent attention than a slab because the crawl space hides the first signs of trouble. That is why the practical answer to how often should pier beam foundation be inspected stays tied to moisture, access, and past movement rather than to the calendar alone.